
Welcome back to Part 2 of Designing Disney’s The Lion King Junior, the Scenic Design Edition. If you are just joining us and haven’t read the previous blog I have included some relevant information to fill you in on our design ideas. If you have read the last one, feel free to skip ahead!
The intention for the design aesthetic for our production of The Lion King, Junior was to do a (mostly) non-masked production that looked very different than the iconic Julie Taymor designs, but still retained some of the scale and magic of the original production, but on a much more modest school budget. I did not want it to look like a cheesy replica of the original, which it would have if we had tried to replicate the designs. Most schools do not have the time or budgets to create the level of detail and craftsmanship you would see in a Disney production. We scaled the sets and costumes way back and focused on the essence of the story and characters which proved to be a really smart decision and resulted in a production everyone was really proud of.
Some Background and Challenges:
The National Tour of The Lion King was going to be in town for a month leaving a few weeks before our performances, so it would make for an easy comparison between the productions for both students and parents.
Our stage was fairly small and not very deep with little to no wing space. To cross over from one side of the stage to the other you needed to go outside through the side doors in the wings and run around the building. There is no fly system. We were working with a black traveler in front of a concrete block wall to the outside in the back and some cream colored curtains across the front of the stage. We only have about 9 feet of height between the stage floor and the teaser.
Production Concept: Set
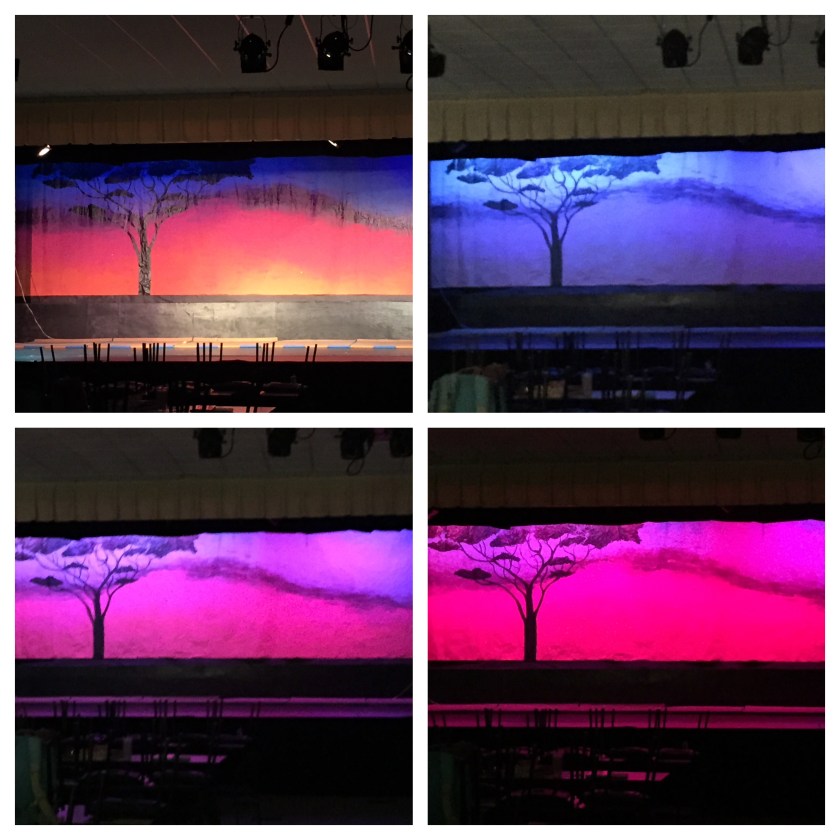
Due to our massive space limitations we knew a unit set was the only way to go. With the help of a fantastic Art Teacher, the 6th grade art classes painted a stunning African Savanna sunrise/sun set complete with an Umbrella Tree on Tyvek. We used our leftover paint from our production of Bye Bye Birdie in the fall (photo of the set below), and the colors ended up working really well under the lighting.

Using our (very old) strip lights with white, red and blue gels we were able to make it appear that the time of day was shifting throughout the show.
Pride Lands and Jungle
We used painted umbrellas in tans for the desert and green for the jungle to easily move on and off stage to differentiate the Pride Lands from the Jungle of Timon and Pumbaa. The umbrellas were also used for choreography in “I Just Can’t Wait to Be King” and “Hakuna Matata”. We ordered large white wedding umbrellas in bulk and spray painted them with several matte and metallic shades and finished them off with some glitter spray paint to achieve the desired effect. This was an easy way to change the look of the stage without having to store large set pieces in our almost non-existent wings.


Scar’s Lair
There are quite a few scenes that transition quickly back and forth between the Pride Lands and Scar’s Lair in the beginning of the show. We have very limited space and wanted to give Scar a really different environment from the African Savanna befitting his quest for power. Our Scar was very debonair and sleek, a Machiavellian evil genius and needed a flashy place to call home. We rehung the red satin curtains I had made for 42nd Street over our existing main curtains using large binder clips and gave him a gold armchair upholstered in the same fabric to act like a throne and played the scenes in front of the curtain. The contrast of the red with his black and gold costume and the costumes of the Hyenas was very striking and added to Scar’s evil persona.


The Stampede and The Gorge
The Stampede was created using many of our dancers and the actors playing the lionesses dressed in all black with Commedia masks and brown satin cloaks (around 20 people). We used tap for this number to up the stakes and because this was the only place in the show we used masks it had a strong effect. We rehearsed this number without Young Simba initially and then put her into it, she was completely freaked out the first time we tried it and was convinced she was going to fall off the stage (she didn’t). When Mufasa is pushed off by Scar we used the brown cloaks to hide part his fall (he was caught by other members of the cast) and when they cleared the stage he was lying dead center stage, and Scar took the crown from his dead body. I was really proud of all of the students for fully committing to this moment. “The Mourning” had many of the parents in the audience in tears.


They Live in You
LED Flashlights are amazing things. For these numbers we had much of the cast dressed in all black with small flashlights in each hand. They created the backdrop of stars behind Mufasa and Simba to symbolize the ancestors. We lit the father and son with high powered adjustable beam flashlights. Everything was bought for around $25.00 on Amazon. Sometimes simple solutions can be incredibly powerful. There is a video clip from the number below taken at a dress rehearsal.
Tune in next week for the Costume Design process. Want to know more details on the different elements of this production or need some tips and tricks for staging The Lion King, Junior? Comment below and I am happy to help!
